PF macOS & BSD
BSD
apple
macOS
pf
For Mac OS X & BSD users PF can be the best option to create a kill switch.
PF (Packet Filter, also written pf) is a BSD licensed stateful packet filter, a central piece of software for firewalling. It is comparable to netfilter (iptables), ipfw and ipfilter. PF was developed for OpenBSD, but has been ported to many other operating systems. https://en.wikipedia.org/wiki/PF_(firewall)
To create a kill switch using PF, a configuration file
TL;DR killswitch is a CLI command that can help finding the active interfaces, create and load pf rules.
Example of a killswitch.pf.conf configuration file:
The file can be created on the user $HOME directory and have any name.
int_en1 = "en1"
vpn_utun1 = "utun1"
vpn_ip = "1.2.3.4"

set block-policy drop
set ruleset-optimization basic
set skip on lo0

block all
block out inet6

# dns
pass quick proto {tcp, udp} from any to any port 53 keep state

# Allow broadcasts on internal interface
pass from any to 255.255.255.255 keep state
pass from 255.255.255.255 to any keep state

# Allow multicast
pass proto udp from any to 224.0.0.0/4 keep state
pass proto udp from 224.0.0.0/4 to any keep state

# Allow ping
pass on $int_en1 inet proto icmp all icmp-type 8 code 0 keep state

# Allow dhcp
pass on $int_en1 proto {tcp,udp} from any port 67:68 to any port 67:68 keep state

# use only the vpn
pass on $int_en1 proto {tcp, udp} from any to $vpn_ip
pass on $vpn_utun1 all
The first 3 lines need to be changed/adjusted based on the running system.
int_en1 = "en1"     # active interface
vpn_utun1 = "utun1" # VPN interface
vpn_ip = "1.2.3.4"  # VPN peer IP
After editing the killswitch.pf.conf file, the PF rules can be loaded by
running:
$ sudo pfctl -Fa -f ~/killswitch.pf.conf -e
To disable:
$ sudo pfctl -d
To load your system defaults (no kill switch)
$ sudo pfctl -Fa -f /etc/pf.conf -e
In some cases where the VPN peer IP is random, the VPN needs to be connected first and later load the kill switch PF rules, otherwise wont be possible to connect.
active interface
In this example int_en1 is the active interface (WiFi) to find the
active interfaces run the following command within a terminal:
$ route get 0.0.0.0 2>/dev/null | awk '/interface: / {print $2}';
or
$ ifconfig | pcregrep -M -o '^[^\t:]+:([^\n]|\n\t)*status: active'
This commands can give more information:
$ networksetup -listnetworkserviceorder
$ scutil --dns
VPN interface
After connecting to the VPN, by running the command ifconfig -a and
searching for POINTOPOINT, could help to find the interface used by the VPN:
$ ifconfig -a | grep -i POINTOPOINT
gif0: flags=8010<POINTOPOINT,MULTICAST> mtu 1280
utun0: flags=8051<UP,POINTOPOINT,RUNNING,MULTICAST> mtu 2000
utun1: flags=8051<UP,POINTOPOINT,RUNNING,MULTICAST> mtu 1500
In this example there are 3 interfaces, but in many cases only 1 will be active
and with an assigned IPv4, by using the
command ifconfig <interface_name>> this can be found, example:
$ ifconfig utun1
utun1: flags=8051<UP,POINTOPOINT,RUNNING,MULTICAST> mtu 1500
	inet 172.21.21.233 --> 172.21.21.233 netmask 0xfffffe00
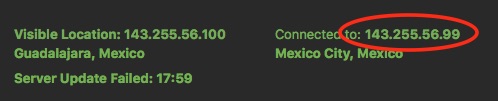
VPN PEER IP
This is the IP of the VPN server providing the service, after connecting to the VPN many apps display this IP:
Once knowing the active interface this can be double checked by using the
command netstat, example:
$ netstat -rna -f inet | grep en1
default            192.168.1.1        UGSc            7        2     en1
143.255.56.99/32   192.168.1.1        UGSc            2        0     en1
143.255.56.99      192.168.1.1        UGHWIi          2     5239     en1
If you know your current gateway (for example 192.168.1.1) this also can give
the current endpoint IP (93.15.82.54) in this case:
$ netstat -rn | grep 192.168.1.1
default            192.168.1.1        UGScI          52        0     en1
93.15.82.54        192.168.1.1        UGHS            4  1112367     en1